依赖的发展历史
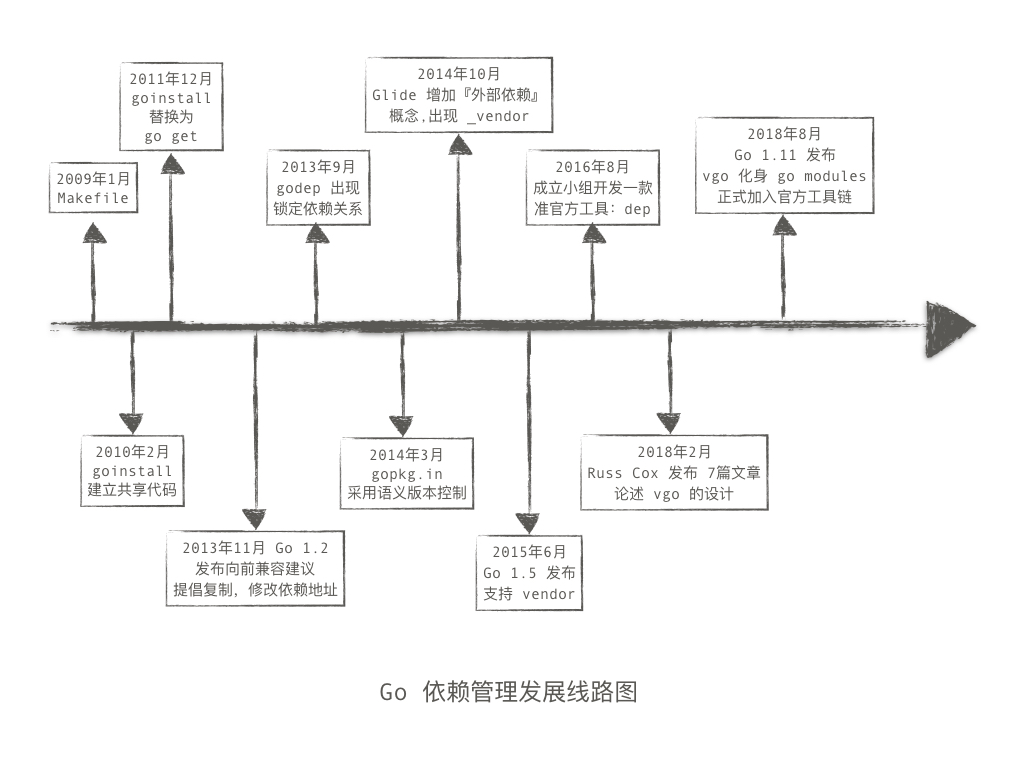
2009 年 1 月
刚开始 Go 语言雏形还不完善,用户只能使用官方库和自己开发的库来构建自己的程序,这时候使用还是 Makefile, 但是 Go 的设计目标是使写代码变得更加容易。 所以后来 Go 命令不使用 Makefiles 或者其他配置文件来指导程序的构建。Go 使用源代码来查找依赖关系并确定构建的条件。
2010 年 2 月
在 2010 年 2 月, 一篇名为:goinstall: an experiment in package installation 的文章在 Go 的讨论组中发布,主要是建立一个代码共享的机制,通过 goinstall 命令把依赖的代码库下载到本地,并通过 import 来引用这些代码。goinstall 的设计是下载的地址和引用的地址保持一致,比如 :
- goinstall github.com/user/project.git
那么使用的时候也是
1 | import "github.com/user/project.git" |
这种方式在社区引起了广泛的讨论, 主要包括引用的名字是否应该包含完整的路径,是否要考虑引用的版本,甚至有人提出把版本好加到引用路径中, 在当时的情况下 Russ Cox 选择了继续使用当前的方式,但是后来也证明有些建议是有用的,比如版本号。
2011 年 12 月
到了 2011 年 12 月, Go 语言统一了使用 go 命令代替之前的 gomake/gotest/goinstall等命令。其中 go get 命令代替之前的 goinstall 正式加入 Go 语言中。
2013 年 9 月
go get 虽然可以下载外部依赖,但是却没有版本的概念,这样就无法向用户保证每次下载代码的预期。 于是一些开源方案出现了。这些开源方案借鉴了其它语言的依赖管理方式,并结合 Go 语言自身的特点产生了各种各样的方案,其中最早的就是 godep, godep 主要是提供了一个依赖文件,这个文件记录了每个的依赖的具体的版本和路径,编译的时候把这些依赖下载到一个特定的目录 workspace 中, 然后 checkout 到特定的版本,再把这个目录加入到 GOPATH中,这样就能利用 Go 的编译查找路径编译特定的版本了。
2013 年 11 月
Go 官方同样注意到了这个问题,为了改善中情况在 Go 1.2 中添加了有关版本控制的相关建议:
Packages intended for public use should try to maintain backwards compatibility as they evolve. The Go 1 compatibility guidelines are a good reference here: don’t remove exported names, encourage tagged composite literals, and so on. If different functionality is required, add a new name instead of changing an old one. If a complete break is required, create a new package with a new import path.
主要是让用户遵循兼容性原则,不要随便删除和修改已经提供的方法,如果要修改最好是增加新的方法而不是修改旧的方法,如果真的需要不兼容则重新建立一个包。
但是这种建议是没有约束力的,开发者如果没有遵循这个建议还是会产生各种问题,无法从根本上保证。
2014 年 3 月
还有一种方案是 gopkg.in 采用的, 那就是对不同的版本进行不同的命名,通过引入路径的不同区分不同的版本。
例如: gopkg.in/yaml.v1, 我们使用这个版本就要使用 import "gopkg.in/yaml.v1"。对于 gopkg.in 来说只是提供了一种利用 URL 版本化解决版本依赖的问题, 实际的存储地址在 github.com 上,如果版本号不发生改变就要保证向前兼容。
这种做法需要我们引入的时候带上版本号,并且之前 go get 的方案也有人提出了使用带版本的引入方案,但是都没有得到官方的认可,认为这种方法具有一定的侵入性。
2014 年 10 月
Glide 的发布提出了 _vendor 的概念,把所有依赖都放入这个目录,这其实与 godep 的 workspace 作用一样。Glide 还有一些优势就是可以添加包的映射关系,因为随着时间的推移很多包的地址发生了改变,或者报名发生了改变,但是为了不让使用者修改代码,可以使用这个映射来解决。 这也是后来 go module 方案借鉴的。
2015 年 6 月
随着社区的发展,官方也开始接纳社区的一些方案,总于在 Go 1.5 版本中正式加入了 vendor 概念。1.5 版本以后 Go 的编译从原来依赖 GOPATH和 GOROOT 有增加了一个 vendor 目录的依赖,这个目录存在于当前库的根目录,编译的时候会优先使用 vendor 目录,然后再去 GOPATH 下查找。
这个方案推出以后很多开源软件也很快进行跟进,把原来依赖 GOPATH 的修改改为依赖 vendor 目录。
之前GOPATH 的问题: Go程序通常由来自许多不同来源的程序包组成。 这些来源中的每一个都可以从GOPATH或标准库中获取。 但是,只有他们的项目受其自己的源代码管理。 依赖的包不受他们的管理和控制,如果依赖包发生更改或消失时就会影响项目的编译。 通常为了避免这些问题,有以下几种做法:
- 将依赖包复制到项目目录中,并重写引用它的导入。
- 将相关程序包复制到项目代码库中,并修改GOPATH变量以包括项目特定的子目录。
- 将依赖包版本写到一个文件中,然后将现有的GOPATH软件包更新为该版本。
但是这些做的后果同样会产生对应的问题:
- 需要修改导入路径,还会存在包名冲突的问题, 分不清自己的和依赖的包。
- 存在多个 GOPATH, 而且是嵌套的,很容易出现查找不准等问题。
- 在正常的GOPATH中修改程序包要求每个项目都具有唯一的GOPATH。 否则不同项目就会产生相互干扰。
vendor 的加入是为了解决 GOPATH 的不足, 开发者可以把依赖放到 vendor 中而不影响其它项目,也可以防止依赖的变更和丢失。对于第二个作用也会产生一个副作用:代码库依赖太庞大,照成存储上的浪费。
vendor 还有一个问题是版本不明确,无法通过 vendor 很好的进行版本管理。
2016 年 8 月
前面说开源工具比较混乱,是因为大家使用不同的依赖管理工具,有一个问题就是你的间接依赖的版本如何确定? 因为某些间接依赖的版本根据依赖管理工具的使用来标明的,如果使用不同的依赖管理工具就无法获取你的间接依赖版本,或者需要兼容你得依赖管理工具,这样做太难了。最好的方式当然是统一依赖管理工具,这样能够很好的进行依赖的分析。
2016 年 GopherCon 大会后, 一个计划改善 Go 依赖管理的民间组织成立了。这个组织的目的就是为了开发一个能够完善的解决包依赖管理问题的方案。这个方案就是: dep 。这个小组甚至邀请了一些开源的依赖管理工具的作者:
- Daniel Theophanes (govendor)
- Dave Cheney (gb)
- Matt Farina (Glide)
- Steve Francia (Hugo, Cobra)
作为顾问。
dep 工具和开源的依赖管理工具思路是一样的:
- 依赖 GOPATH 判断包的依赖地址和版本
- 依赖 vendor 下载依赖到项目下,保证编译版本一致
为了让你能够从其它依赖管理工具迁移到 dep, dep 还会分析已经项目中已经存在的常见的依赖管理文件,并在初始化的时候与里面的依赖版本保持一致。
2018 年 2 月
最终还是来到了 2018 年,这年 2 月 Russ Cox 在自己的个人网站上发布了 7 篇博文,并与 3 月份在 Go 官方网站开启了此提案, 并且于 5 月 21 日(日子不错) 被接受。文章发布社区顿时就炸了,特别是 dep 的成员。因为这个提案完全不同于之前的工作方式,让之前的工作都付诸东流,甚至有人觉得 Go 的官方不尊重社区,太独裁了。随后 Russ Cox 又发表了 4 篇博文, 加上之前的一共发布了 11 篇博文来论证新的依赖管理方案: vgo。
关于 vgo 的方案下面会详细介绍。
2018 年 8 月
随着 Go 1.11 的发布,vgo 化身为 go modules, 对应命令 go mod 加入到了官方的工具链当中,并且从语言底层进行了支持。Go Modules 的发布意味着 Go 语言的依赖管理方案最终又要走向官方的统一方案,开源方案也纷纷表示不再支持更新,建议大家选用官方方案。
以上就是 Go 语言依赖管理发展的前世今生。
当然这不表示这个方案已经完美,Go Modules 还在不断发展当中,很多特性也会加入,但是总体的思想和设计方案不再会有变动。
Go Modules
Go Modules 已经被官方发出,所以后面的趋势就是会统一 Go 语言依赖管理的方案,结束现在混乱的状态,所以每个 Go 语言开发者都应该学习和使用 Go Modules。 下面会花更多的篇幅对Go Modules的设计思想和使用进行详细介绍。
Go 依赖管理的三个原则
Go 从出生开始的动机就是为了简化软件工程。这种动机也体现在 Go 的依赖管理设计上,分别是:兼容性,可重复性和合作性三个原则。
Go 依赖管理的设计原则是 Go Modules 设计与其它管理方案如: Dep,Cargo,Bundler等设计不同的原因。 也是为什么没有选择 Dep 的原因。
1 兼容性 (引入版本号到 import 语句中)
兼容性或者成为稳定性,是指程序中名称的含义不应随时间而发生改变。 如果确实需要发生改变, 则需要跟之前的引入路径保持不同。
对于兼容性主要有一些异议:
- 美学
对于 Go 来说良好的软件工程性比一些主观上的美学更加重要。 视觉美学我们会习惯它们, 但我们更重视它们带来的精确性和简单性。对于 Go 的设计可以举两个例子:
1.1 Go 语言去掉 export 关键字而使用首字母大小写代替是否可导出,从编程习惯是需要适应,但是也能够一眼看出哪些调用是可导出的。
1.2 导入路径看上去有点儿长,但是能够更加精细的表示导入的模块,从而避免了不必要的重复。 - 需要修改导入路径
我们把版本号加入导入路径使导入路径在语义上保持精确。另一个好处是,当您从软件包的v2升级到v3时,您可以逐步,分阶段地(一次可能一个软件包)逐步更新程序。这种方案之前也有提出,但是被否定了,就是处于美观的考虑,但是这种方式除了不太美观没有其他副作用,而且能够更好的解决问题。 - 构建中的多个主要版本
其它依赖管理工具不允许同一个代码库的不同版本同时被依赖, 这样能够降低开发者的复杂性,但是对用户来说则可能会更加复杂,而且时间情况中无法避免同一个项目的代码在他的所有依赖文件中出现不同的版本。
2 可重复性 (最小版本选择)
当您构建特定版本的程序包时,构建应以可重复的方式决定要使用的依赖项版本,该依赖关系不会随着时间的推移而改变。
对这个原则的主要异议在于,很多人认为使用最新的版本是一项基本的诉求,很多人希望能够使用最新的版本到达更新一些 bug 的修复和性能的提升等。但是同时大家都会认为构建的可重复性是更加重要的,因为这能够保证程序的稳定性,这是最基本的要求。一些依赖工具例如 Dep 会优先使用最新版本,但是为了保持稳定性还有一个 lock 文件保证某些依赖的版本不变。Dep 的 lock 文件问题在于只会对当前代码库生效,如果这个代码库是其他库的一部分,那么就无法保证这种稳定性。所以 Go Modules 通过最小版本依赖原则来优先保证构建的稳定性。
3 合作性 (共同致力于兼容性)
为了维护Go软件包生态系统,我们必须共同努力, 致力于保证兼容性。工具无法解决缺乏合作的问题。
无论是基于 SAT 算法的 Dep 还是基于最小版本原则的 Go Modules 都无法保证兼容性。但是最小版本选择比 SAT 更加具有稳定性( 证明可以看这里: Go Modules 与 SAT 解决方案对比)
语义化版本
Go Modules 引入了语义化版本来标识软件的版本,而且是强制的。语义化版本就是把版本号分为三位,分别代表不同的含义:
- 第一位版本号(major version): 一些不兼容的修改
- 第二位版本号(minor version): 一些新特性的增加
- 第三位版本号(patch version): 一些 bug 的修复

小版本的更新不会破坏你的代码(向后兼容), 如果出现了错误你应该报告给作者,让他进行修改;大版本的更新可能会让你的代码无法编译,因为大版本可能不是向后兼容的,但是这种改变可能正式作者期望的。
这个规范是建议性的并没有约束力,而且根据 hyrums 定律:
With a sufficient number of users of an API, it does not matter what you promise in the contract. All observable behaviors of your system will be depended on by somebody.
当接口的使用者数量达到一定数量后,你指定的规则就不重要了,所有的表现都取决于他的使用者。
也就是无法保证大家都按照这个规范执行了,但是语义版本控制仍然是一种构架对发布之间关系的期望的有用方法。目前还没有其它更好的代替方法。
关于语义化版本的引入, Russ Cox 还说:
A year ago, I believed that putting versions in import paths like this was ugly, undesirable, and probably avoidable. But over the past year, I’ve come to understand just how much clarity and simplicity they bring to the system. In this post I hope to give you a sense of why I changed my mind. @Russ Cox
可见大佬的想法也会随时间而改变, 没有一个东西开始就是完美的,但是谨慎的引入,原则的坚持总不会错的。
最小版本原则
在 Go Modules 之前,Go 版本选择有两种情况:
第一种算法是默认行为go get:如果您有本地版本,请使用该版本,否则请下载并使用最新版本。此模式可能使用的版本过旧:如果您已安装B 1.1并运行go get以下载A,则go get不会更新为B 1.2,从而导致构建失败或错误。
第二种算法的行为是go get -u:下载并使用所有内容的最新版本。此模式通过使用太新的版本而失败:如果您运行go get -u下载A,它将正确更新为B 1.2,但也会更新为C 1.3和E 1.3,这不是A所要求的,可能没有经过测试,可能无法正常工作。
可见这两种情况都不能保证构建的稳定性。
最小版本原则的计算方式
为了说明最小版本原则,我们通过 Russ Cox 博客中给出的例子进行讲解。首先给出一个初始的依赖关系:
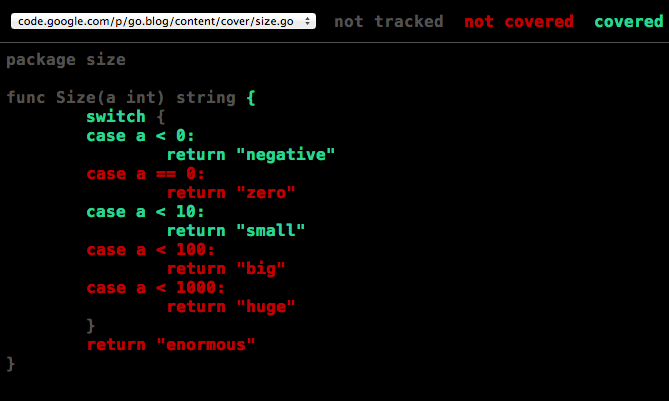
为了验证我在自己的 github 页面建立的对应的代码库,和对应的标签。 但是有一个循环依赖的问题我认为是无法满足的,所以做了一些改变, 但是并不影响整体的逻辑。 有关循环依赖的这个问题可以参考 #issue24098
1. 构建需求列表
我们根据初始的依赖关系,可以按照下图中黄色的部分表示查找的路径:
对于同一个模块的不同版本,我们会选择最高的版本,下面就是这个算法的选择过程:
最终我们的依赖关系可以在原来的基础上表示,黄色的部分我们保留,表示之前的查找路径,红色部分就是表示最终的依赖路径和依赖的模块版本:

我们也可以使用 go list 命令查看响应的依赖关系:
1 | $go list -m all |
这里的最小版本原则就是指及时 C 发布了更新的版本 C1.3,但是如果不主动更新这个版本,每次构建的依赖还是 C1.2 版本,最大程度的保证了构建稳定性。 而 dep 这些依赖管理工具则会选择最新版本,很容易就会发现依赖发生了非常大的变化,每次都见都会随着版本的发布而改变,不可预期的可能性大大提高了。
2. 升级所有模块
如果我们想升级目前依赖的所有模块到最新版本(这里的最新版本是指经过发布的语义化版本), 保持之前的黄色模块依赖,红色部分表示最新的依赖关系和选择的模块。
升级所有模块的命令是:1
$go get -u
升级后可以查看模块选择:1
2
3
4
5
6
7
8$go list -m all
github.com/two/a
github.com/two/b v1.2.0
github.com/two/c v1.3.0
github.com/two/d v1.4.0
github.com/two/e v1.3.0
github.com/two/f v1.1.0
github.com/two/g v1.2.0
3. 计算最小需求列表
对与使用 go.mod 的项目, 如果依赖的包也使用了 go.mod, 那其依赖的版本在go.mod 中已经做了说明了,所以当前的项目就可以不写这个依赖文件了。 例如前面升级所有模块后的 go.mod 文件长这样:
1 | module github.com/two/a |
这里只是列出了必须的模块的依赖, 例如 github.com/two/f 模块可以通过 github.com/two/c模块的依赖表示,就没有必要写进去。
但是 github.com/two/f 引用的是 github.com/two/g 的 v1.1.0, 这里由于需要的是 v1.2.0, 所以回单独列出来。
4. 升级单个模块
大多数情况下我们并不会一次升级所有模块,因为这样带来的不确定性太大,我们一般都会根据需求来升级模块,如果你的依赖没有你需要的新的特性或者 bug 的修复你就没有必要升级。 假如我们要在初始的依赖关系中升级 C1.2 到 C1.3 版本, 我们可以使用命令:
1 | go get -u github.com/two/c |
升级完成后我们可以看一下依赖的关系:
1 | $go list -m all |
根据这个依赖关系,可以画出对应的依赖关系图,红色表示最终的依赖。
这里注意一个问题, C1.3 并不依赖 D1.4, 而 B1.2 依赖的是 D1.3, 也就是说没有模块依赖 D1.4, 但是在最终的版本选中却保留了 D1.4 而不是 D1.3。如果我们降级 D 则会带来一些非预期的结果,并且我们的依赖不再稳定,也违背了最小更改的原则。 所以 Go Modules 要保证不能为你带来非预期的自动降级。
5. 降级
假如我们发现 D1.4 有一个 bug , 这个 Bug 是 D1.3 引入的,我们需要将 D1.3 降级到 D1.2, 这时我们也需要将引入 D1.3 及以上版本的 B1.2 和 C1.2进行降级,因为如果只降级了 D 则 B1.2 和 C1.2 很可能使用了 D1.3以上版本的功能导致不可预期的事情发生。 可以用灰色来表示不可用的模块版本:
下面我们对 D 进行降级:1
go get github.com/two/d@v1.2.0
降级后的依赖关系:
1 | go list -m all |
由于我们要遵循最小更改原则,所以我们不会主动降级下一层的依赖 E1.2, 最终我们的依赖关系用图来表示就是:
生成的 Go Module 文件如下:
1 | module github.com/two/a |
依赖文件中的 // indirect 是非常有用的,特别是对于一些升级和降级的模块来说,我们不能直接按照新的规则来计算依赖的版本,而要保持最小的变动原则,这个注释就是指那些发生了模块的变动但是需要保持版本和依赖的一些模块。 如果我们不保留这个模块的描述最终的依赖就会是跟新生成的依赖一样,不会有这些版本的要求,会存在一些非预期的风险, 无法尽可能的保证依赖的稳定性。
假如我们删除这两行,改为:
1 | module github.com/two/a |
通过命令查看依赖关系:
1 | go list -m all |
对应的依赖关系图:
这种降级是没有必要的,因为我们认为 D1.2 要比 D1.1 更好,而 E1.2也会比 E1.1 更好, 而且他们都做到了向下兼容,如果都进行了降级反而会产生一些不好的结果,稳定性也下降。
Go Modules 引入的变化
有了以上的理论和算法基础,Go Modules 的引入就变得不那么难了,Module 的概念就是公共引用前缀,是版本控制的单位。Module 的引入带来了几个变化:
- 提倡使用明确的发行版本而不是某个提交的 ID,可以清楚地表明预期。
- 引入了代理的概念(GOPROXY),
2.1 不依赖各种版本控制工具下载,防止碎片化,都改为使用 HTTP 协议, 代码库都是以 zip 的形式存在。
2.2 通过 GOPROXY 缓存依赖,保证可用性(可重复下载)和安全性(安全检测)
2.3 将来还会引入共享代理,可以默认使用共享代理(类似其它语言的集中式管理) 通过独立的版本控制在单个代码库中开发多个模块
有两种方式:- 使用单独的分支表示不同的版本
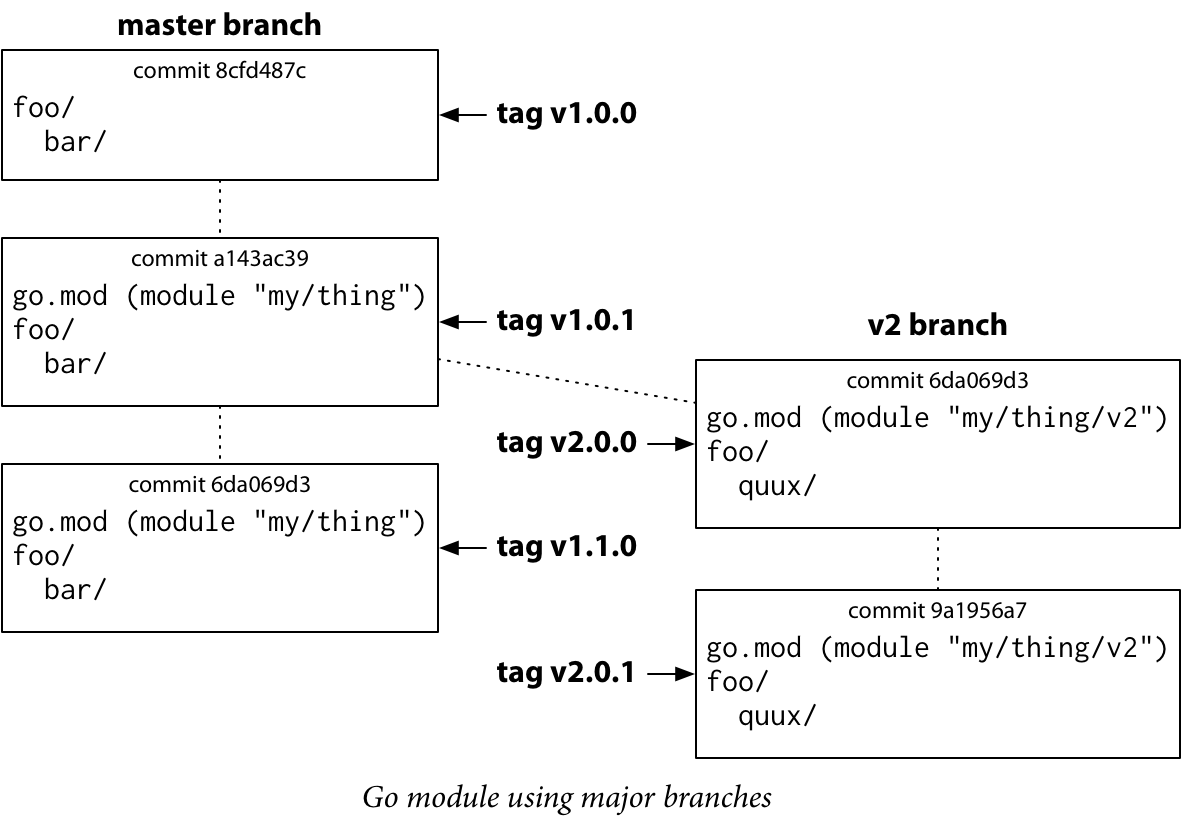
- 通过子目录表示不同的版本

vgo 两种都支持,但是第二种能够更加平滑
- 使用单独的分支表示不同的版本
不再需要 vendor
vendor 目录有两个作用。首先,他们通过其内容指定要在期间使用的依赖项的确切版本。其次,即使原始副本消失了,它们也可以确保这些依赖项的可用性。
但是 vendor 也有一个弊端就是代码的副本太多了,每个代码库都要提交依赖,占用了大量的存储库的信息。vgo 已经解决了 vendor 所带来的两个好处,所以它就没有存在的必要性了。
在编译时 vgo 会忽略 vendor 目录的存在,如果你还想强制使用 vendor 可以使用:go build -mod=vendor- 不再需要 GOPATH
注意你的代码库不再依赖 GOPATH, 但是目前如果还在 GOPATH 下,默认是不开启 Go Modules 的,如果你不在 GOPATH 则会开启 Go Modules。不依赖 GOPATH 不意味着不需要 GOPATH, 只是你自己的代码不需要放到这个目录下,但是一些编译的输出,和依赖库的缓存还是会放到这个目录下。
为了保证再现性,可验证性和经过验证的构建方式, Go Modules 做了以下几点:
- 通过最低版本原则保证每次构建下载的都是同一版本的代码
- 通过 hash 值保证每个版本代码都有一个唯一的标识
- 通过 hash 对比保证每个依赖的版本与 hash 对应,防止篡改
使用
go.mod & go.sum 文件
go.mod 和 go.sum 文件成对同时出现在模块的根目录中。
go.mod 文件记录了依赖的关系和版本。 go.mod 文件支持四种命令:
module:
出现在文件第一行表示的是此模块的名字,这个模块名字就是被其他模块引用时的名字,如果不一致就会报错。require:
记录依赖的包及版本号replace
有些包的地址发生了变化,可以通过这个来指向另一个包, 不必修改 import 的地址exclude
有些包的某个版本有问题,需要在这里明确支持不使用某个版本
下面是一个 go.mod 文件的例子:
1 | module github.com/two/a |
go.sum 记录用于安全性和完整性校验的信息。 go.sum 文件 每行的格式都是:
1 | <模块> <版本> [/ go.mod] <哈希> |
没有 /go.mod 的是表示这个版本的模块的源代码的 hash 值(使用 SHA-256算法)
带有 /go.mod 的表示这个版本的模块的 go.sun 文件的 hash 值
1 | github.com/two/b v1.2.0 h1:1w6ZrvIUmiXBRX/cmUlzAy1fA76mgBY55/5LlpxfbiA= |
go.sum 文件并不是必须的,go.sum 中记录的模块主要是用户本地校验,既使用下载到本地的模块与 go.sum 中的校验值进行对比,如果 go.sum 中没有对应的模块,则会到一个远程的校验数据库进行校验,这个远程数据库通过 Go 语言环境变量 GOSUMDB 来设置,当然也可以选择不校验。
相关环境变量
通过 go env 命令我们可以看到所有的环境变量,其中跟 Go Modules 相关的主要有下面几个:
注意: 这里是针对 Go 1.13 版本进行说明。由于 Go Modules 还在不断发展中,很多东西不太成熟,会存在一些新增的环境变量。
GOPATH:
这个变量大家都很熟悉了,但是在 Go Modules 中他的含义发生了变化,用户的代码不需要放到这个路径下,但是依然需要这个路径,Go Modules 下载的依赖放在这个路径下:
1 | $GOPATH/pkg/ |
其中 mod/cache 目录下是从代理服务器下载下来的原始文件,包括打包好的源代码,依赖文件和hash 值等信息。mod/github.com 目录下放的是解压后的代码,其中每个代码库都会放到以 module@version 格式命名的目录中,这也解决了同一个环境下放置多个版本文件的问题,解决了环境的相互干扰。
另外说明的一点是: 下载的依赖都是针对特定版本的,不会包含提交的历史信息,大大减少依赖的文件大小。
如果我们要清楚缓存文件,可以使用 go clean -modcache 命令, 这个命令会删除 $GOPATH/pkg/mod 路径下的所有内容。
GO111MODULE:
这个变量表示是否开启 Go Modules 功能,因为是在 Go 1.11 版本加入的,所以叫 GO111MODULE。这个变量又三个值,分别是:GO111MODULE=off: 强制不使用,依赖 GOPATHGO111MODULE=on: 强制使用GO111MODULE=auto: 如果当前模块在 $GOPATH/src 中不使用,如果不在 $GOPATH/src 目录中并且存在 go.mod 文件则使用
GOPROXY&GONOPROXY:GOPROXY是指代理服务器的地址, 用户可以指定代理服务器来下载依赖,目前有几个知名的代理服务器,包括 goproxy.io, goproxy.cn 以及官方提供的 proxy.golang.org。Go Modules 发布后有很多企业没有使用还有一个原因是所有的代码库都要走代理,但是有些代码库是企业内部的,并且有权限的控制的,这些不想走代理,于是在 Go 1.13 又加入了一个GONOPROXY变量,通过设置这个变量可以决定哪些依赖不走代理,而是直接通过原来的方式从源地址下载。GOSUMDB&GONOSUMDB:
这两变量是控制完整性校验的。通过GOSUMDB我们可以设置远程的校验地址,当我们下载的依赖不在 go.sum 文件中时,我们就要通过这个地址远程校验。当然我们也可以忽略校验,通过设置GONOSUMDB可以选择哪些模块不需要进行校验,特别是一些私有的代码库。GOPRIVATE:
这个其实可以看成是GOPRIVATE=GONOPROXY+GONOSUMDB。 如果设置了GOPRIVATE就相当于同时设置了GONOPROXY和GONUSUMDB。GOMOD:
当前模块的 go.mod 文件路径,是动态的,如果不在 go 模块中则默认是:/dev/null
相关命令行
go mod
运行 go help mod 命令可以看到支持下列几个参数:
1 | Go mod provides access to operations on modules. |
一般我们的使用步骤是这样:
初始化
go mod init [package name]
如果在 GOPATH下面之行,则默认使用的是相对 GOPATH 的路径,如果不是则需要加包名作为参数。建立一个空的包:
例如:go mod init example.com/m
生成 go.mod 文件:
1 | module example.com/m |
自动添加
我们可以不用特意添加自己的依赖,如果我们执行 go build 或者 go test 等命令则会自动帮我们下载依赖并写入到 go.mod 文件中。版本选择,如果我们的依赖中有依赖文件并且写明了版本则会根据最小版本原则进行选择,如果我们的依赖没有指名版本则会下载最新的版本,这个最新版本是指语义优化标签最大的版本,如果没有语义化标签则自动生成一个标签: (v0.0.0)-(提交时间, UTC 时间)-(commit id) 作为版本的标识。
自动整理
go mod tidy, 通过这个命令我们可以自动整理当前的依赖文件,把需要的文件加入,把不再需要的依赖删除。 其实如果我们执行 go build 或者 go test 也会自动更新这个依赖文件。Go 语言的目的是尽量减轻用户的操作,所以能帮你做的都做了。
更新
go get -u [package name] 可以用来更新依赖的版本,如果加了具体的包名则只更新这一个包,如果没加则更新所有依赖包。
本地调试
使用 Go Module 后如果我们需要依赖一个或者多个包来进行调试,而这个依赖的包还没有正式提交,我们该如何做呢? 这里有两种方案:
使用 replace:
我们可以借助 go modules 的 replace 关键字把依赖的地址改为本地未提交的版本所在的地址, 例如我们依赖example.com/m2,但是这个包还在开发中并未发布,我们可以在 go mod 文件中加上:1
replace example.com/m2 => /local/path/to/my/module
这样我们就可以在本地随时修改依赖包进行调试了。 但是这样做有一个缺点就是我们需要修改 go.mod 文件,如果我们调试完不小心提交了这个文件,可能会照成一些不必要的麻烦,我们还有第二种方式。
使用 vendor:
虽然 vendor 目录已经不是 go modules 所需要的了,但是这个目录不会从 Go 语言中去掉,相关的讨论可以看 vgo & vendoring 的内容。默认如果开启了 go module 那么go build将会忽略 vendor 目录的内容,但是如果我们在编译的时候加上一个参数:go build -mod=vendor则还是会优先查找 vendor 下的依赖。如果我们将在开发中的依赖放入 vendor 目录中,编译的时候加上这个mod=vendor参数则可以满足我们调试的需求。如果我们将 vendor 目录加入版本控制之外,则不会影响我们的正常开发和提交。
go list
go list -m [all]: 列出当面 module, all 表示所有依赖的模块也列出来go list -m -versions (package name): 列出某个依赖的所有版本
go clean
清除一些编译的缓存文件,go moduels 之后加了一个新参数: -modcache, 如果执行:go clean -modcache 则会清楚所有$GOPATH/pkg/mod 目录下的已经下载的依赖文件,这个在一些第三方依赖存在错误,或者校验失败的情况下可以使用。
参考文献
- Semantic Import Versioning
- A Proposal for Package Versioning in Go
- Using Go Modules
- Migrating to Go Modules
- Publishing Go Modules
- Go Modules: v2 and Beyond
- Semantic Versioning 2.0.0
- Our Software Dependency Problem
- Go 1.5 Vendor Experiment
- I still love you , GOPATH
- Go source code
- Go 1.5’s vendor/ experiment
- Understanding and using the vendor folder
- vgo
- Dependency Management session at GopherCon
- Go Packaging Proposal Process
- add package version support to Go toolchain
- Vendoring discussion at GopherCon
- Hyrum’s law:
- Go 1.11 Modules wiki