golang标准库
net/http做为client时有哪些细节需要注意呢,这里做一个详细的分析。
net/http client工作流程
首先分析一下client的工作流程。 下面是一般我们进行一个请求时的代码事例:
1 | func DoRequest(req *http.Request) (MyResponse, error) { |
代码中我们首先创建一个http.Client, 所有的值都是默认值,然后调用client.Do发请求,req是我们请求的结构体。这里我们也可以用client.Get, client.Post等函数来调用,从他们的源码来看都是调用的client.Do。client.Do的实现在net/http包的go/src/net/http/client.go源文件中。可以看到函数内部主要是实现了一些参数检查,默认值设置,以及对于多跳请求的处理,最为核心的就是:1
2
3
4
5
6
7
8
9
10
11
12
13
14
15
16
17
18
19...
if resp, didTimeout, err = c.send(req, deadline); err != nil {
// c.send() always closes req.Body
reqBodyClosed = true
if !deadline.IsZero() && didTimeout() {
err = &httpError{
err: err.Error() + " (Client.Timeout exceeded while awaiting headers)",
timeout: true,
}
}
return nil, uerr(err)
}
var shouldRedirect bool
redirectMethod, shouldRedirect, includeBody = redirectBehavior(req.Method, resp, reqs[0])
if !shouldRedirect {
return resp, nil
}
...
这里真正发请求的函数就是c.send, 这个函数的实现也比较简单, 主要是调用了send函数,这个函数的实现主要如下:
1 | // didTimeout is non-nil only if err != nil. |
1 | // send issues an HTTP request. |
这里真正进行网络交互的定位到的函数是rt.RoundTrip,这个函数的定义是一个interface,从其注释也可以看出他的主要作用是:1
2// RoundTrip executes a single HTTP transaction, returning
// a Response for the provided Request.`
由于这个函数是一个interface我们需要知道是谁实现了这个函数,看一下send的参数就可以找到,实现这个函数的是c.transport()的返回值,这个函数的实现如下:1
2
3
4
5
6func (c *Client) transport() RoundTripper {
if c.Transport != nil {
return c.Transport
}
return DefaultTransport
}
这里可以看到,返回的对象是c.Transport或者DefaultTransport, 由于我们创建client的时候没有设置c.Transport参数,所以这里返回的应该是DefaultTransport对象, 这个对象对RoundTripper函数的实现大概如下:1
2
3
4
5
6
7
8
9
10
11
12
13
14
15
16
17
18
19
20// RoundTrip implements the RoundTripper interface.
//
// For higher-level HTTP client support (such as handling of cookies
// and redirects), see Get, Post, and the Client type.
func (t *Transport) RoundTrip(req *Request) (*Response, error) {
...
for {
...
pconn, err := t.getConn(treq, cm)
...
if pconn.alt != nil {
// HTTP/2 path.
t.setReqCanceler(req, nil) // not cancelable with CancelRequest
resp, err = pconn.alt.RoundTrip(req)
} else {
resp, err = pconn.roundTrip(treq)
}
}
...
}
里面具体的细节我们先不关系,对于HTTP/2的处理我们也先不关心。这里需要重点关注的是t.getConn这个函数。t.getConn的作用是获取一个链接,这个链接该怎么获取,是一个值得深究的问题。下面看一下这个函数的关键实现细节:1
2
3
4
5
6
7
8
9
10
11
12
13
14
15
16
17
18
19
20
21
22
23
24
25
26
27
28
29
30
31
32
33
34
35
36
37
38
39
40
41
42
43
44
45
46
47
48
49
50
51
52
53
54
55
56
57
58
59
60
61
62
63
64
65
66
67
68
69
70
71
72
73
74
75
76
77
78
79
80
81
82
83
84
85
86
87
88
89
90
91
92
93// getConn dials and creates a new persistConn to the target as
// specified in the connectMethod. This includes doing a proxy CONNECT
// and/or setting up TLS. If this doesn't return an error, the persistConn
// is ready to write requests to.
func (t *Transport) getConn(treq *transportRequest, cm connectMethod) (*persistConn, error) {
req := treq.Request
trace := treq.trace
ctx := req.Context()
if trace != nil && trace.GetConn != nil {
trace.GetConn(cm.addr())
}
if pc, idleSince := t.getIdleConn(cm); pc != nil {
if trace != nil && trace.GotConn != nil {
trace.GotConn(pc.gotIdleConnTrace(idleSince))
}
// set request canceler to some non-nil function so we
// can detect whether it was cleared between now and when
// we enter roundTrip
t.setReqCanceler(req, func(error) {})
return pc, nil
}
...
handlePendingDial := func() {
testHookPrePendingDial()
go func() {
if v := <-dialc; v.err == nil {
t.putOrCloseIdleConn(v.pc)
}
testHookPostPendingDial()
}()
}
cancelc := make(chan error, 1)
t.setReqCanceler(req, func(err error) { cancelc <- err })
go func() {
pc, err := t.dialConn(ctx, cm)
dialc <- dialRes{pc, err}
}()
idleConnCh := t.getIdleConnCh(cm)
select {
case v := <-dialc:
// Our dial finished.
if v.pc != nil {
if trace != nil && trace.GotConn != nil && v.pc.alt == nil {
trace.GotConn(httptrace.GotConnInfo{Conn: v.pc.conn})
}
return v.pc, nil
}
// Our dial failed. See why to return a nicer error
// value.
select {
case <-req.Cancel:
// It was an error due to cancelation, so prioritize that
// error value. (Issue 16049)
return nil, errRequestCanceledConn
case <-req.Context().Done():
return nil, req.Context().Err()
case err := <-cancelc:
if err == errRequestCanceled {
err = errRequestCanceledConn
}
return nil, err
default:
// It wasn't an error due to cancelation, so
// return the original error message:
return nil, v.err
}
case pc := <-idleConnCh:
// Another request finished first and its net.Conn
// became available before our dial. Or somebody
// else's dial that they didn't use.
// But our dial is still going, so give it away
// when it finishes:
handlePendingDial()
if trace != nil && trace.GotConn != nil {
trace.GotConn(httptrace.GotConnInfo{Conn: pc.conn, Reused: pc.isReused()})
}
return pc, nil
case <-req.Cancel:
handlePendingDial()
return nil, errRequestCanceledConn
case <-req.Context().Done():
handlePendingDial()
return nil, req.Context().Err()
case err := <-cancelc:
handlePendingDial()
if err == errRequestCanceled {
err = errRequestCanceledConn
}
return nil, err
}
}
下面是这个过程的流程图:
从上面可以看到,获取链接会优先从连接池中获取,如果连接池中没有可用的连接,则会创建一个连接或者从刚刚释放的连接中获取一个,这两个过程时同时进行的,谁先获取到连接就用谁的。
当新创建一个连接, 创建连接的函数定义如下:1
func (t *Transport) dialConn(ctx context.Context, cm connectMethod) (*persistConn, error)
最后这个函数会通过goroutine调用两个函数:1
2go pconn.readLoop()
go pconn.writeLoop()
其中readLoop主要是读取从server返回的数据,writeLoop主要发送请求到server,在readLoop函数中有这么一段代码:1
2
3
4
5
6
7
8
9
10// Put the idle conn back into the pool before we send the response
// so if they process it quickly and make another request, they'll
// get this same conn. But we use the unbuffered channel 'rc'
// to guarantee that persistConn.roundTrip got out of its select
// potentially waiting for this persistConn to close.
// but after
alive = alive &&
!pc.sawEOF &&
pc.wroteRequest() &&
tryPutIdleConn(trace)
这里可以看出,在处理完请求后,会立即把当前连接放到连接池中。
上面说到连接池,每个client的连接池结构是这样的:idleConn map[connectMethodKey][]*persistConn。其中connectMethodKey的值就是client连接的server的host值, map的值是一个*persistConn类型的slice结构,这里就是存放连接的地方,slice的长度由MaxIdleConnsPerHost这个值指定的,当我们不设置这个值的时候就取默认的设置:const DefaultMaxIdleConnsPerHost = 2。
另外这里我们插一个知识点,对于HTTP协议,有一个header值”Connections”, 这个值的作用就是client向server端发请求的时候,告诉server是否要保持连接。具体的可以参考rfc2616。 这个协议头的值有两种可能(参考MDN文档):1
2Connection: keep-alive
Connection: close
当值为keep-alive时,server端会保持连接,一直到连接超时。当值为close时,server端会在传输完response后主动断掉TCP连接。在HTTP/1.1之前,这个值默认是close, 之后是默认keep-alive, 而net/http默认的协议是HTTP/1.1也就是默认keep-alive, 这个值可以通过DisableKeepAlives来设置。
从上面的介绍我们可以看出,net/http默认是连接复用的,对于每个server会默认的连接池大小是2。
接下来我们看一下连接是如何放进连接池的:1
2
3
4
5
6
7
8
9
10
11
12
13
14
15
16
17
18
19
20
21
22
23
24
25
26
27
28
29
30
31
32
33
34
35
36
37
38
39
40
41
42
43
44
45
46
47
48
49
50
51
52
53
54
55
56
57
58
59
60
61
62
63
64
65
66
67
68
69
70
71
72
73
74
75func (t *Transport) putOrCloseIdleConn(pconn *persistConn) {
if err := t.tryPutIdleConn(pconn); err != nil {
pconn.close(err)
}
}
// tryPutIdleConn adds pconn to the list of idle persistent connections awaiting
// a new request.
// If pconn is no longer needed or not in a good state, tryPutIdleConn returns
// an error explaining why it wasn't registered.
// tryPutIdleConn does not close pconn. Use putOrCloseIdleConn instead for that.
func (t *Transport) tryPutIdleConn(pconn *persistConn) error {
if t.DisableKeepAlives || t.MaxIdleConnsPerHost < 0 {
return errKeepAlivesDisabled
}
if pconn.isBroken() {
return errConnBroken
}
if pconn.alt != nil {
return errNotCachingH2Conn
}
pconn.markReused()
key := pconn.cacheKey
t.idleMu.Lock()
defer t.idleMu.Unlock()
waitingDialer := t.idleConnCh[key]
select {
case waitingDialer <- pconn:
// We're done with this pconn and somebody else is
// currently waiting for a conn of this type (they're
// actively dialing, but this conn is ready
// first). Chrome calls this socket late binding. See
// https://insouciant.org/tech/connection-management-in-chromium/
return nil
default:
if waitingDialer != nil {
// They had populated this, but their dial won
// first, so we can clean up this map entry.
delete(t.idleConnCh, key)
}
}
if t.wantIdle {
return errWantIdle
}
if t.idleConn == nil {
t.idleConn = make(map[connectMethodKey][]*persistConn)
}
idles := t.idleConn[key]
if len(idles) >= t.maxIdleConnsPerHost() {
return errTooManyIdleHost
}
for _, exist := range idles {
if exist == pconn {
log.Fatalf("dup idle pconn %p in freelist", pconn)
}
}
t.idleConn[key] = append(idles, pconn)
t.idleLRU.add(pconn)
if t.MaxIdleConns != 0 && t.idleLRU.len() > t.MaxIdleConns {
oldest := t.idleLRU.removeOldest()
oldest.close(errTooManyIdle)
t.removeIdleConnLocked(oldest)
}
if t.IdleConnTimeout > 0 {
if pconn.idleTimer != nil {
pconn.idleTimer.Reset(t.IdleConnTimeout)
} else {
pconn.idleTimer = time.AfterFunc(t.IdleConnTimeout, pconn.closeConnIfStillIdle)
}
}
pconn.idleAt = time.Now()
return nil
}
首先会尝试把连接放入到连接池中,如果不成功则关闭连接,大致流程如下:
如果DisableKeepAlives为true表示不使用连接复用,所以请求完后会把连接关掉,但是这里需要注意的是,同时发请求的时候我们会设置Connections: close, 所以server端发送完数据后就会自动断开,所以这种情况的连接其实是server端发起的。
长连接与短连接
前面我们已经讲过net/http默认使用HTTP/1.1协议,也就是默认发送Connections: keep-alive的头,让服务端保持连接,就是所谓的长连接。
再看DefaultTransport的值:1
2
3
4
5
6
7
8
9
10
11
12
13
14
15
16
17// DefaultTransport is the default implementation of Transport and is
// used by DefaultClient. It establishes network connections as needed
// and caches them for reuse by subsequent calls. It uses HTTP proxies
// as directed by the $HTTP_PROXY and $NO_PROXY (or $http_proxy and
// $no_proxy) environment variables.
var DefaultTransport RoundTripper = &Transport{
Proxy: ProxyFromEnvironment, //代理使用
DialContext: (&net.Dialer{
Timeout: 30 * time.Second, //连接超时时间
KeepAlive: 30 * time.Second, //连接保持超时时间
DualStack: true, //
}).DialContext,
MaxIdleConns: 100, //client对与所有host最大空闲连接数总和
IdleConnTimeout: 90 * time.Second, //空闲连接在连接池中的超时时间
TLSHandshakeTimeout: 10 * time.Second, //TLS安全连接握手超时时间
ExpectContinueTimeout: 1 * time.Second, //发送完请求到接收到响应头的超时时间
}
当我们使用DefaultTransport时,就是默认使用的长连接。但是默认的连接池MaxIdleConns为100, MaxIdleConnsPerHost为2,当超出这个范围时,客户端会主动关闭到连接。
如果我们想设置为短连接,有几种方法:
- 设置
DisableKeepAlives = true: 这时就会发送Connections:close给server端,在server端响应后就会主动关闭连接。 - 设置
MaxIdleConnsPerHost < 0: 当MaxIdleConnsPerHost < 0时,连接池是无法放置空闲连接的,所以无法复用,连接直接会在client端被关闭。
Server端出现大量的TIME_WAIT
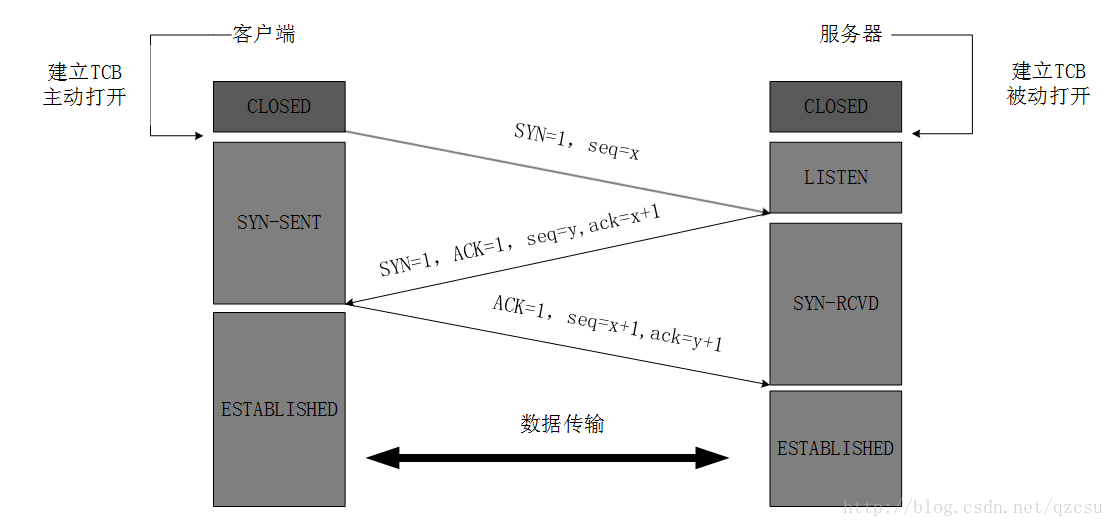
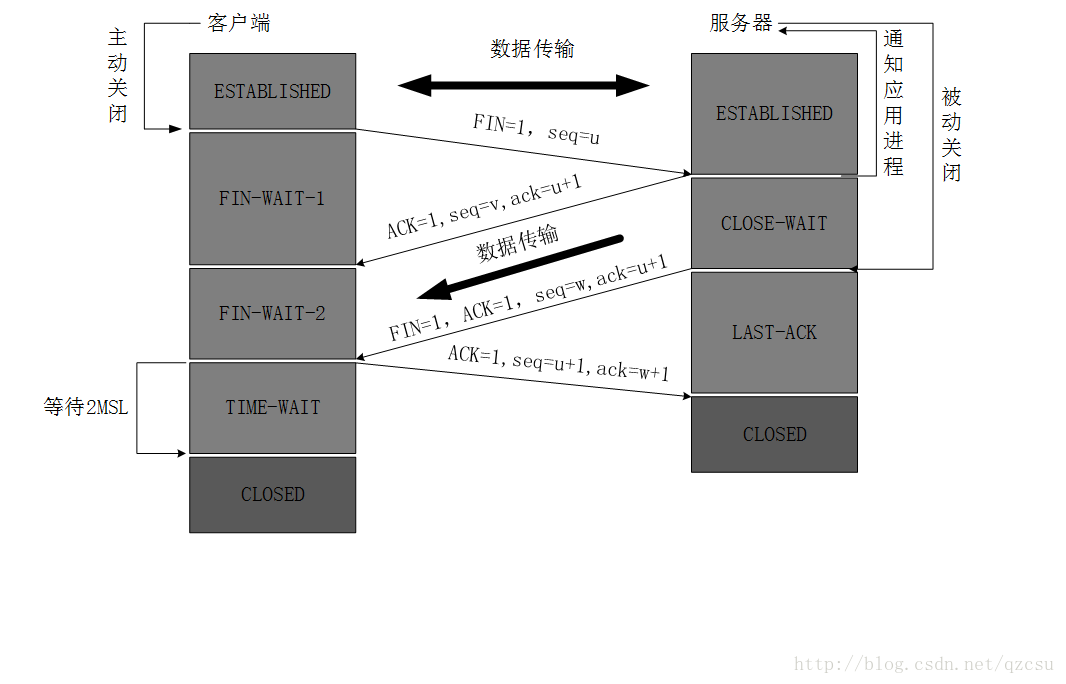
当我们在实际使用时,会发现Server端出现了大量的TIME_WAIT,要想深入了解其原因,我们首先先回顾一下TCP三次握手和四次分手的过程:

图中可以看出,TIME_WAIT只会出现在主动关闭连接的一方,也就是server端出现了大量的主动关闭行为。
默认我们是使用长连接的,只有在超时的情况下server端才会主动关闭连接。前面也讲到,如果超出连接池的部分就会在client端主动关闭连接,连接池的连接会复用,看着似乎没有什么问题。问题出在我们每次请求都会new一个新的client,这样每个client的连接池里的连接并没有得到复用,而且这时client也不会主动关闭这个连接,所以server端出现了大量的keep-alive但是没有请求的连接,就会主动发起关闭。
todo:补充tcpdump的分析结果
要解决这个问题以下几个方案:
client复用,也就是我们尽量复用client,来保证client连接池里面的连接得到复用,而减少出现超时关闭的情况。- 设置
MaxIdleConnsPerHost < 0:这样每次请求后都会由client发起主动关闭连接的请求,server端就不会出现大量的TIME_WAIT 修改
server内核参数: 当出现大量的TIME_WAIT时危害就是导致fd不够用,无法处理新的请求。我们可以通过设置/etc/sysctl.conf文件中的1
2
3
4#表示开启重用。允许将TIME-WAIT sockets重新用于新的TCP连接,默认为0,表示关闭
net.ipv4.tcp_tw_reuse = 1
#表示开启TCP连接中TIME-WAIT sockets的快速回收,默认为0,表示关闭
net.ipv4.tcp_tw_recycle = 1达到快速回收和重用的效果,不影响其对新连接的处理。
另外需要注意的是,虽然DisableKeepAlives = true也能满足连接池中不放空闲连接,但是这时候会发送Connections: close,这时server端还是会主动关闭连接,导致大量的TIME_WAIT出现,所以这种方法行不通。
以上就是我总结的关于net/http中连接池相关的知识。